Physical Address
304 North Cardinal St.
Dorchester Center, MA 02124
Physical Address
304 North Cardinal St.
Dorchester Center, MA 02124
In recent years, lace front closures have become an essential part of the beauty industry. They provide a versatile solution for those who want to switch up their hairstyles without committing to permanent changes. Knowing how to install a lace front closure is a valuable skill that can transform your appearance with ease. This guide will walk you through every step needed to achieve a flawless look, ensuring your hair appears natural and stunning. We will look into various tips and tricks, helping you master the art of installation effortlessly.

The demand for lace front closures has surged due to their ability to create a natural appearance. Unlike traditional wigs, lace fronts can blend seamlessly with the skin, making them popular among celebrities and everyday users alike. This technology allows you to style your hair in various ways without exposing your natural hair, safeguarding it against heat and styling damage. Whether you’re looking for a protective style or simply want to enhance your look, understanding how to install a lace front closure correctly is essential.
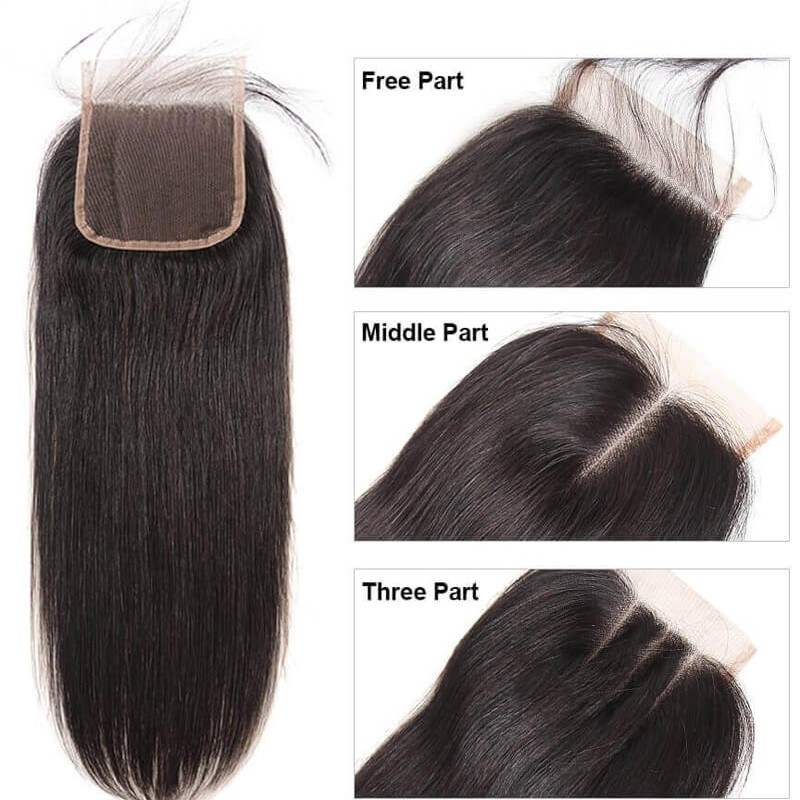
Before embarking on the installation journey, selecting the right type of lace closure is critical. Lace closures typically come in two main types: Swiss lace and HD lace. Swiss lace is known for its durability and is slightly thicker, which may be ideal for beginners. HD lace, on the other hand, is thinner and offers a more transparent finish, blending better with diverse skin tones. Choosing the right lace type can significantly impact how natural your closure looks once installed.
Selecting a lace front closure that matches your hair texture and color is crucial for achieving a seamless look. Whether you prefer straight, wavy, or curly textures, ensure that the closure complements your natural hair. Additionally, think about the color; picking a closure that is too light or too dark can stand out against your scalp. Look for options that best mimic your hair’s state and color, enhancing the overall appearance once it’s installed.
Preparation is key to a successful lace front closure installation. Start by thoroughly washing and conditioning your natural hair. Clean hair minimises the risk of buildup and ensures a better grip for the adhesive you’ll use. Taking care of your natural hair is vital to avoid damage during installation. Once cleaned, allow your hair to air dry before moving to the next step. This ensures the adhesive has a clean and smooth surface to stick to.
Once your hair is clean and dry, it’s time to prepare it for the installation. Braiding your natural hair flat against your scalp creates an even base for the lace front closure. There are various braiding techniques to choose from, including cornrows or flat twists. Choose a method that you are comfortable with and that lies flat. If your hair is short or too thick to braid, using a wig cap can suffice in holding everything together.
Before jumping into installation, gather all your tools and products. You will require a wig cap, adhesive (liquid glue or tape), scissors, a comb, a foundation powder that matches your skin tone, and a makeup brush. Having everything ready ensures a smooth installation process without interruptions. Remember, each item serves an essential purpose—pay attention to detail at every step!
The next step involves placing the wig cap securely over your braided hair. Make sure the cap covers your entire natural hair and fits snugly around the perimeter of your head. You can use bobby pins to secure the cap better, especially around the ears and nape. This provides a flawless base that will enhance the final look and minimize any possible friction between your natural hair and the closure.
Now it’s time to apply the adhesive. Depending on your choice of glue, the application technique may slightly vary. For liquid glue, apply it along your hairline where the lace closure will sit. Use a makeup brush for an even application. Allow the glue to become tacky before proceeding. If you’re using tape, cut it into pieces and place it along the hairline, ensuring it’s well aligned.
At this stage, pick up your lace closure, holding it by the edges. Carefully position it over the adhesive, ensuring it aligns properly along your natural hairline. Check that the closure rests comfortably on your head. It helps to use a comb to press the lace slightly into the adhesive for a secure fit, ensuring there are no bubbles or gaps.
Once you’re satisfied with the placement, press down on the lace closure firmly, ensuring it adheres well to the glue. If needed, you can apply additional adhesive around the edges to reinforce the hold. Adjust the closure to ensure it feels comfortable on your scalp. Use a comb or your fingers to press down on the lace, further securing it and minimizing any potential movement.
Once the closure is secured and adhering properly, it’s time for styling. You can trim any excess lace beyond the hairline carefully. Using scissors, cut in a zigzag fashion for a more natural effect. After trimming, you can style your closure as desired—curling, straightening, or setting it in any particular style. Remember to use heat protectants to maintain the integrity of the hair, ensuring it appears stunning and full of life.
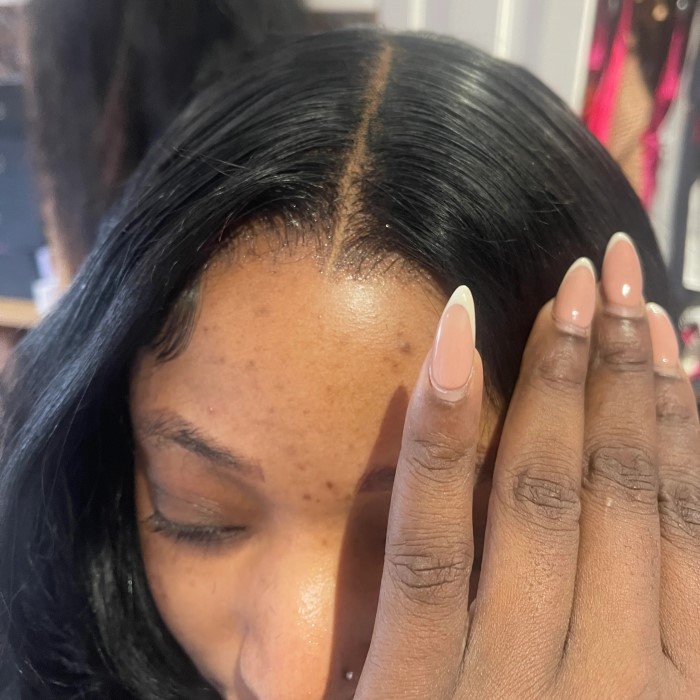
Achieving a natural look is a concern for many, and specific techniques can help in this regard. First, ensure the lace is close to your skin tone. If needed, apply a foundation or powder that matches your complexion onto the lace, enhancing the blend. Additionally, you can customize the hairline by gently plucking a few hairs, making it appear less uniform and more natural. A good rule of thumb is to mimic a natural hairline, so don’t be afraid to experiment slightly.
One common mistake when learning how to install a lace front closure is using excessive adhesive. This can lead to shiny spots that detract from the natural look. Always stick to thin layers, allowing it to dry properly between applications.
Choosing the wrong lace can also result in an unnatural appearance. Ensure that the lace matches your skin tone as closely as possible. If you cannot find an exact match, consider dyeing the lace cautiously or consult professionals for color recommendations.
Another frequent mistake is overlooking the importance of preparing your natural hair. Neglecting to clean and braid your hair can lead to discomfort and an uneven installation. Ensure that your natural hair is in good condition to ensure a successful application.
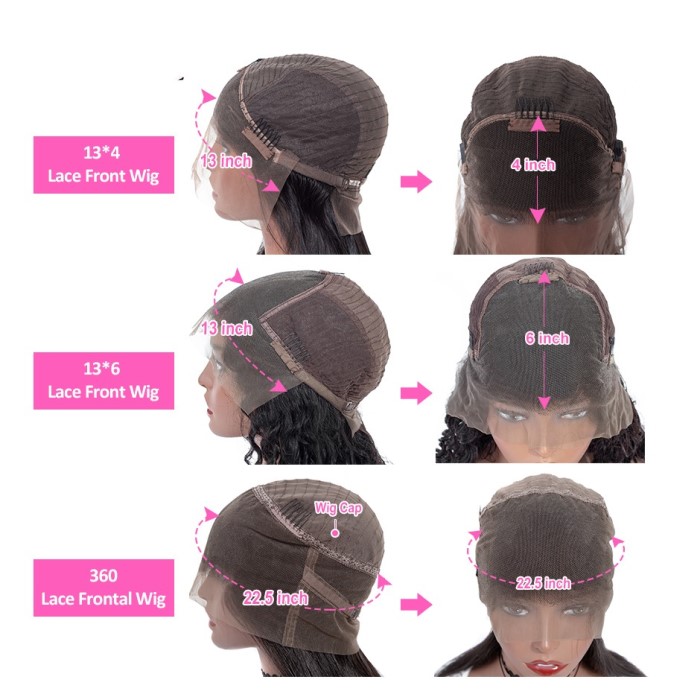
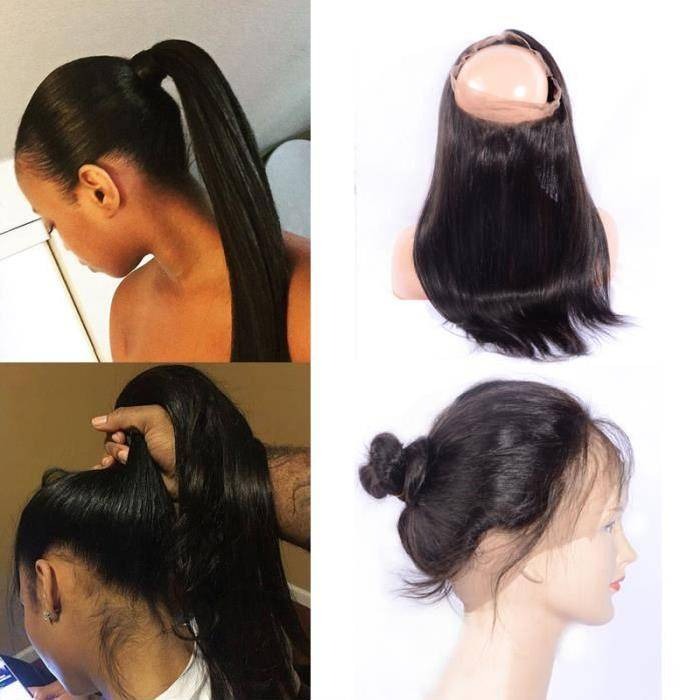
The primary difference lies in coverage. A lace closure typically covers a small portion of the head, while a frontal wig spans ear-to-ear, allowing for more styling versatility, such as ponytails or braids. Closures are often simpler to install and maintain.
Common mistakes include poor placement and using too much adhesive. If the lace is not aligned correctly with the natural hairline, it can create a visible edge. Also, neglecting to use a wig cap can lead to an uncomfortable fit.
To achieve a natural look, ensure your lace front closure matches your skin tone. Use a compatible foundation over the lace for blending, and customize the hairline by plucking hairs along the edges to mimic natural growth.
Mastering how to install a lace front closure is an incredibly rewarding skill. With the right methods and techniques, you can achieve a look that transforms your hairstyle effortlessly. By following this detailed guide, you’ll not only enhance your personal style but also protect your natural hair. Whether for a special event or day-to-day wear, lace front closures allow you to express yourself in any way you desire. So, equip yourself with the knowledge, gather your tools, and dive into the world of lace front closures. Happy styling!